The safest place for your baby’s car seat is the rear center seat, if your vehicle allows for a secure installation there. If not, any rear passenger seat is a safe choice. This guide provides step-by-step instructions, from choosing the right spot to securing your child, ensuring you follow the latest safety guidelines for every journey.
Key Takeaways
- The Rear Center is King: The middle of the back seat is statistically the safest spot, offering the most protection from side-impact collisions.
- Never the Front Seat: A rear-facing car seat must never be placed in the front passenger seat with an active airbag, as it can cause fatal injury.
- Read Both Manuals: Successful installation depends on following both your car seat manual and your vehicle’s owner manual for seatbelt/LATCH instructions.
- The Inch Test is Crucial: Once installed, the car seat should not move more than one inch side-to-side or front-to-back at the belt path.
- Harness Fit is Paramount: The harness straps should be snug (pinch test) and the chest clip positioned at armpit level for proper restraint.
- Rear-Facing is Non-Negotiable: Keep your child rear-facing for as long as possible, until they reach the seat’s maximum height or weight limit.
- Get a Professional Check: Even confident parents should seek a free inspection from a certified Child Passenger Safety Technician (CPST) for peace of mind.
Where Baby Car Seat Should Be Placed for Maximum Safety
Bringing your new baby home is a huge moment. You want everything to be perfect. And safe. One of the most important safety items you’ll ever buy is a car seat. But buying the best seat is only half the battle. You need to know where baby car seat should be placed in your vehicle and how to install it correctly.
This guide will walk you through everything. We’ll cover the safest position, step-by-step installation, and common mistakes to avoid. By the end, you’ll feel confident that your most precious cargo is protected on every trip.
The Golden Rule of Car Seat Placement
Let’s start with the most important rule. All infants and toddlers should ride in a rear-facing car seat, in the back seat of the vehicle, for as long as possible. This is not just a suggestion. It’s the cornerstone of child passenger safety.
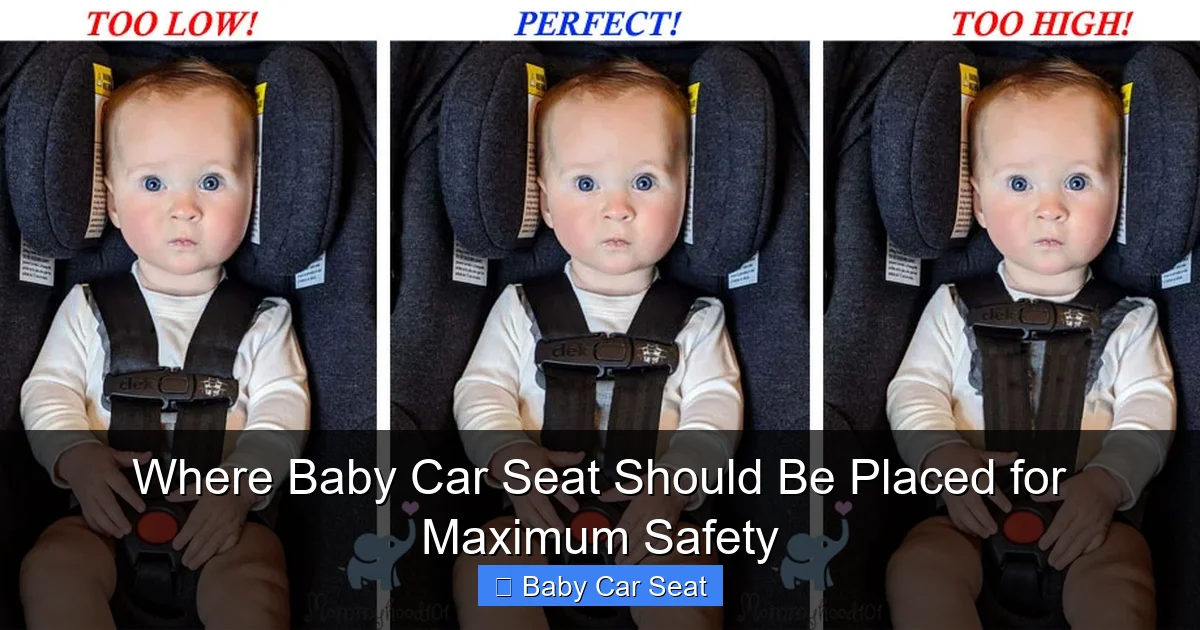
Visual guide about Where Baby Car Seat Should Be Placed for Maximum Safety
Image source: mommyhood101.com
Why? A rear-facing seat cradles your child’s head, neck, and spine. In a frontal crash (the most common type), the seat absorbs the force and distributes it across the child’s entire back. This protects their fragile neck and spinal cord. We’ll now break down the “where” part of that golden rule.
Choosing the Safest Spot in Your Car
Not all back seat spots are created equal. Here’s a breakdown of the positions, from best to acceptable.
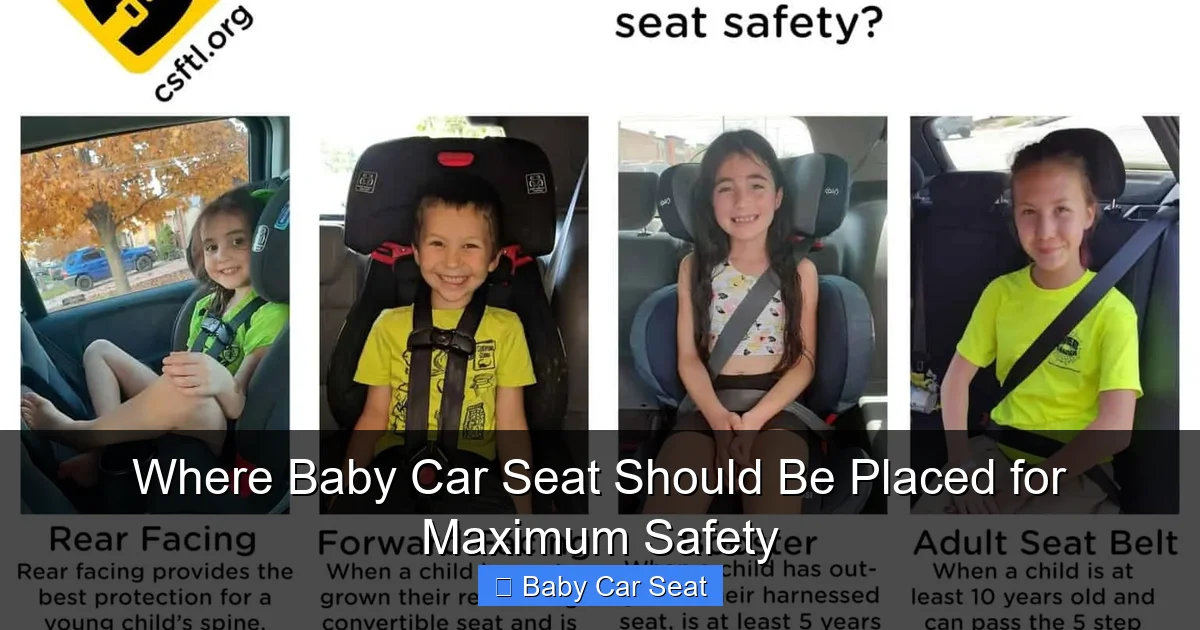
Visual guide about Where Baby Car Seat Should Be Placed for Maximum Safety
Image source: csftl.org
1. The Rear Center Seat (The Safest Position)
This is the premier spot. The rear center seat is the furthest from any point of impact in a side collision. It has the most “crush space.” Think of it as a buffer zone. Statistics consistently show it is the safest place in the vehicle.
But there’s a catch. You can only use this spot if:
- Your vehicle seat is flat and level enough for a secure install.
- Your car seat manual allows center installation.
- Your vehicle manual approves using the center seat with LATCH or seatbelt (some require specific rules for center LATCH use).
Always check both manuals first. If you can make it work here, this is where your baby’s car seat should be placed.
2. The Rear Outboard Seats (Driver or Passenger Side)
If the center seat doesn’t work, either rear passenger seat is a very safe choice. These positions are still in the protective rear seat zone. Most parents choose the seat behind the passenger. It’s often easier to reach your baby and get them in and out from the curb side.
The key is to pick the side where you can get the tightest, most correct installation. Sometimes, the shape of the vehicle seat makes one side better than the other.
The Forbidden Zone: The Front Passenger Seat
This is a hard and fast rule. Never place a rear-facing car seat in the front seat if there is an active front airbag. In a crash, the airbag deploys with tremendous force. It will strike the back of the car seat. This can cause serious head and neck injuries, or even be fatal, for your baby.
The only exception is in rare cases like a pickup truck with only a front seat. In that case, you must manually disable the passenger airbag. Check your vehicle manual. But for almost all families, the back seat is the only option.
Your Step-by-Step Guide to Proper Installation
Knowing where to put it is step one. Step two is installing it rock-solid. Follow these steps every time.

Visual guide about Where Baby Car Seat Should Be Placed for Maximum Safety
Image source: i.pinimg.com
Step 1: Gather Your Tools
You’ll need your car seat, your vehicle owner’s manual, and your car seat instruction manual. Read them both before you start. Also, have your child’s current weight and height handy.
Step 2: Prep the Vehicle Seat
Clear the back seat of any loose items, toys, or debris. Make sure the vehicle seat is flat. Move the front seats forward to give yourself plenty of room to work.
Step 3: Choose Your Method: LATCH or Seat Belt
You have two safe options. You only need to use ONE.
- LATCH (Lower Anchors and Tethers for Children): This is a system of metal anchors in the vehicle seat crack. It includes lower anchors and a top tether (for forward-facing). It’s often easier to get a tight fit. Important: Check your vehicle manual for weight limits on LATCH use. Most have a combined weight limit (child + seat) of 65 lbs.
- Seat Belt: The vehicle’s lap and shoulder belt can be used to install any car seat. It’s just as safe as LATCH when locked properly. You must ensure the seat belt is in locked mode. Pull it all the way out and let it retract to hear it click into lock.
Step 4: Position and Attach the Car Seat
Place the car seat in your chosen rear seat spot. For a rear-facing infant seat, it should recline at the proper angle (usually 30-45 degrees). Most seats have a built-in level indicator. Route the LATCH strap or seat belt through the correct belt path on the car seat (it’s marked in red for rear-facing).
Step 5: Get It TIGHT
This is the most critical part. Put your weight into the car seat. Kneel in it if you can. Push down and back while you pull the LATCH strap or seat belt tight. You want to remove all the slack. The seat should not slide or shift easily.
Step 6: Perform the “One-Inch Test”
Once you think it’s tight, grab the car seat at the belt path (where the seatbelt or LATCH strap goes through). Try to move it side-to-side and front-to-back. If it moves more than one inch in any direction, it’s too loose. Go back to Step 5 and tighten more.
Step 7: Secure Your Child Correctly
Even a perfectly installed seat won’t protect a poorly harnessed child.
- Harness Height: For rear-facing, the harness straps should come from at or below your baby’s shoulders.
- Harness Snugness: Do the “pinch test.” Buckle the harness and tighten it. Try to pinch the strap at the child’s collarbone. If you can pinch any excess webbing, it’s too loose.
- Chest Clip: Position it at armpit level. A chest clip too low can damage internal organs in a crash.
- No Bulky Clothes: Do not put your child in a puffy winter coat in the car seat. The harness can’t tighten properly over the fluff. Instead, buckle them in, then place a coat or blanket over the harness.
Troubleshooting Common Installation Problems
Ran into a snag? Here are quick fixes for common issues.
Problem: Seat is Too Loose (Fails the Inch Test)
Solution: You likely didn’t use enough body weight. Really put your knee and full weight into the seat as you tighten. For seat belts, make absolutely sure it’s in locked mode.
Problem: Car Seat is at the Wrong Angle
Solution: Check the built-in level indicator. If it’s not in the “safe” zone, you can use a rolled towel or pool noodle (check your manual!) under the seat base near the vehicle seat crack to adjust the angle. Never put anything under the seat that didn’t come with it unless the manual says it’s okay.
Problem: I Can’t Get a Good Fit in the Center Seat
Solution: It’s okay! Move to a rear outboard seat. A perfect install in a side seat is safer than a bad install in the center. The vehicle seat hump can make a center install tricky.
When to Change Your Car Seat’s Position
Your car seat’s placement isn’t forever. You’ll move it when:
- You Switch to Forward-Facing: The seat will still be in the back. You must now use the top tether strap for extra security. This is a non-negotiable safety step.
- You Have Another Child: You need to fit multiple seats. The youngest child in the least protective seat (like a booster) should get the most protected spot (center), if possible. Always prioritize the rear-facing child.
- You Get a New Car: You must re-install from scratch in the new vehicle. The shape of the seats and belt paths will be different.
Conclusion: Safety is a Journey
Knowing where baby car seat should be placed—in the back, rear-facing—is your first and most vital decision. Pair that with a rock-solid installation and a properly harnessed child, and you’ve created the safest possible environment for your little one on the road.
Remember, the rules and best practices can change. Always refer to your specific product manuals. And don’t be shy about asking for help. Look up a Child Passenger Safety Technician (CPST) in your area. They offer free checks and are experts at solving tricky installation puzzles. Your baby’s safety is worth that extra step. Drive safely!
🎥 Related Video: How to fit a car seat with seatbelt #baby #carseatsafety #carseat
📺 Winstanleys Pramworld
When installing an infant carrier with seat belt remember lap to lap shoulder around the back. Always ready the instructions that …
